Showing posts with label gardening hacks. Show all posts

DIY gardening apron from an old pair of jeans

By Michael Smith (Veshengro)

Upcycling an old pair of jeans into a gardening apron. Almost costs nothing and should give a long service, especially if sharp tools are put into the pockets in pocket protectors, made from old leather or plastic lotion bottles. 


© 2018

DIY watering can

by Michael Smith (Veshengro)
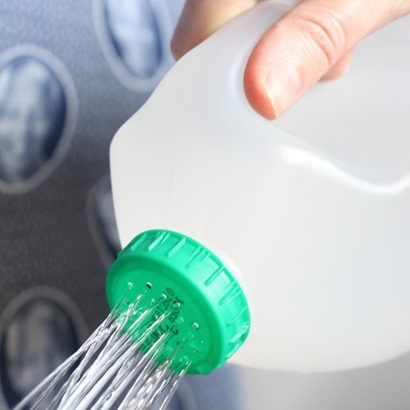
Transform a milk jug into a watering can

Milk jug watering canThis project will have you saving your milk container to create a kid- friendly watering can. But, obviously, it can also used by an adult.

Children love to water plants. Generally this is good news, and watering is a helpful chore the children can take on in the garden. Sometimes, though, overenthusiastic watering can be bad news – plants can become waterlogged and seedlings can rot away. Sometimes seedlings can be damaged in a deluge. For children the standard watering can with seven or more liters can be a little on the heavy side. This DIY watering can with a rose head could be the ideal solution.

Made from a plastic milk bottle or similar container, it is free and a great way to upcycle your junk into something practical. It is easy to make and holds just the right amount of water, so it is not too heavy for young children, as I said above.

Materials

2-3 liter (maybe 4 liter even if can be had) plastic milk or juice bottle with lid

Small drill bit (3-4mm), gimlet or bradawl

Instructions

1. Start by washing out your milk bottle.

2. Use drill with drill bit (you could use a gimlet instead, or even a bradawl) to make small holes in the bottle's lid. Make sure the holes are big enough to allow the water to come out freely.

3. Remove the bottle top to fill your new watering can with water, pop the lid back on, and you are ready to go. The handle on the bottle makes it comfortable to hold, and if necessary, a gentle squeeze can help the water come out.

© 2018

Make you own hanging basket liners

Make you own hanging basket linerYou can make an efficient, hanging basket liner, white or whatever color, that costs next to nothing.

This kind of hanging basket liner will keep your plants in place and moist and it, generally, comes for free, and will last for years, unlike the coir, moss, or even fake moss ones.

You can choose to make drainage holes or not, depending how well your plants may like having their “feet” in water. Considering, however, that generally, hanging baskets, when with bracket attached to wall of house, are in the so-called rain shadow, and thus do not get watered naturally by the rain having no drainage holes in the liner saves you watering on a daily basis.

There are many options for recycling plastic bags for use as handing basket liners. Compost bags of various sizes, as well as others, are suitable and the colors may vary from white, to blue or black. It all depends. On the other hand, other bags you can use might be transparent, which even allows you to see the growth of the roots and thus can see whether plants may get root bound. Spider plants (Chlorophytum comosum) is a candidate that gets root bound in pots or handing baskets quite quickly, which then meas either re-potting or splitting.

As the bags you may be using will not be designed to fit a hanging basket as a liner you will have to do some cutting and some folding and tucking, but it will be worth it alone for the fact that (1) you don't have to buy a liner every year and (2) you keep some plastic out of the waste stream (for some years at least). The important thing is that it works and well worth it. A win-win on so many levels.

© 2018

Uses for chopsticks in gardening

by Michael Smith (Veshengro)

How to use chopsticks in the garden and in gardening indoors and outdoors

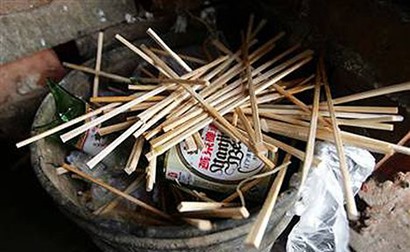
Uses for chopsticks in gardeningEvery year, billions of disposable chopsticks are manufactured in China and shipped across the globe to Asian restaurants and take-out restaurants and with almost every tray of sushi bought in supermarkets and other places you get a set of those as well.

Those chopsticks are made out of a variety of woods, including birch, spruce, cotton wood, or bamboo.

Before even considering using them in the garden and in gardening, though that is what, mostly, we will be looking at here, the first reuse of them is as what they are, namely chopsticks.

I have a couple of sets of those sets at home in the tin cans on the windowsill in the kitchen that hold the various items of cutlery. There is a tin for spoons, for knives, etc. and one of them has also got some (wooden) chopsticks in them (for use). I also carry a small set, in a leather wallet, for on-the go.

While I in no way support deforestation in the name of stuffing our faces with dumplings and Vietnamese Crab Fried Rice, I do appreciate, however, creative ways to reuse and recycle items that are otherwise discarded into the trashcan or at the very least stuffed into a kitchen junk drawer, as is all too often the case also with those chopsticks.

In Japan (and also China now, I believe) a trend was started a while back of “bring your own chopsticks” – much like the “bring your own cutlery” that has been advocated in the West, and this is certainly something that should be encouraged.

So, before reuse of such chopsticks in the garden think of reusing them as what they are and when you want to use chopsticks at home then use those. Or when going out where there is the chance that you may indulge in some Asian food then carry your own set.

Having said that I am well aware that often getting yet another set is unavoidable as in some cases they are prepacked with the meal you purchase and you have no choice and control over this.

Right, now for the reuse of chopsticks in the garden and gardening

Dibblet: A dibblet is one of those small dibbers for separating seedlings and replanting them. Some people use a small stick, a pencil or pen, or such while others spend money, actually, buying a special dibblet. Use a chopstick instead. Works great.

Seed Flags: After you have planted your seeds, it is time to make a label so you know where you have planted what. The best marker is a good old flag: Use colored tape, cut it into a fun flag shape, wrap it around one end of a chopstick, and use a marker to note the name.

Seedling Support Stakes: When seedlings coming up, and are getting tall they may need some support. Insert a chopstick into the dirt next to the plant, and loosely tie a piece of twine or string around it to help keep the plant upright as it grows.

Row Planting Guide: Want to make sure you plant your rows straight? Cut a piece of twine or string a few inches longer than your row will be, or just have a lot more string than you will actually need to have one you can use again and again. Tie each end to the tops of two chopsticks. Stick the chopsticks into the ground at either end of the proposed row so that the twine is suspended like a bridge. If you use more twine than you might need for shorter rows just wind then remaining stuff onto one of the chopsticks. You can use your trowel to dig into the ground directly below the twine, making a perfectly straight row.

Mini “Greenhouse”: Stick three chopsticks into a pot or individual seed starting cell, and fit a plastic bag over the top and you have an instant small propagator.

The above are, obviously, only a few ways in which you can reuse and make use of those chopsticks in the garden and gardening and I am sure many readers can come – and have come up – with other ideas in addition to those presented here.

© 2018

Uses for empty plastic containers in your garden

by Michael Smith (Veshengro)

HarvestingTubs1Plastic bottles to garden cloches: It all, obviously, depends on the size of the bottles but I, personally, use everything from 1 liter (over 3inch pots) to bigger ones – for seed raising. The large one gallon water bottles that, after events in parks and such, are so often tossed out, I use as cloches for bigger plants in the garden itself.

The standard PET bottles of one and even two liter, with their bottoms cut off, fit nicely into the rim of or just over the standard 3inch pots and leaving the top intact and thus removable gives a chance to, when needed, give to air to the mini-greenhouses thus created.

Milk jugs can also be used in the garden as cloches, and they even, as they are opaque, are better for the plants to some extent, as they prevent scorching.

Plastic buckets: The buckets that I am talking about here are those in which various products come for the catering trade, whether it be mayonnaise, oil, or marinated herrings. Most are about a gallon in size, some are bigger, some also smaller, and they make for great bucket garden planters but, obviously, as well can be used as buckets for any number of tasks in and around the garden, as many do have handles, some steel wire, some plastic.

Uses for empty plastic containers in your garden1I have seen several market gardens where all the produce is grown in such buckets and so why should we not make use of those rather than have them go for, if they do, recycling or, as is mostly the case, to landfill. A couple of good sized holes drilled into bottom and the sides around the bottom for drainage and ready you are.

While it is true that many of those containers can be recycled they are not in some areas, or not all, even if they are put into the recycling bins. Thus us finding ways of reusing them is the better option. It also saves us gardeners money.

Harvesting containers: Plastic milk jugs of the 4pt and 6pt size, with a section cut out but the handle left in place and intact, make for great little daily harvesting “buckets”. They also can be carriers for small hand tools for the gardener. If you would want to you could slide one or even two of those onto a belt and then be able to work hands-free.

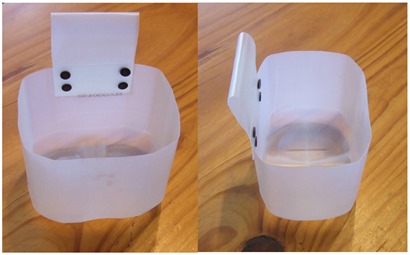
Harvesting or deadheading tub: This is made from the bottom section of a 4pt plastic milk jug (British) and for a belt loop a length of plastic from another jug was riveted to it. Costs were just a little time and a couple of rivets. (see main photo).

Harder plastic bottles such as those from cleaning products can be made into soil scoops, funnels, and many other things useful in the garden (and also around the home).

Those, together with lotion bottles, also can be upcycled and converted into holsters, whether belt-worn or just as pocket protectors, for carrying the likes of secateurs (pruning shears), trowels, as well as sharpening stone(s) for scythe. But the uses are only limited by your imagination.

Personally I am always looking for new ways to repurpose and upcycle such container for use in the garden, around the home, etc., as in fact with much of the waste products that I come across. One just has to think laterally a great deal and sometimes get inspiration from homeware and gardening equipment catalogs. That is how the idea for the harvesting tub from plastic milk jugs came about.

The same I did with various upcycled milk jugs that are on my kitchen windowsill and hold all manner of things such as the dish brushes, etc. The idea came from plastic homeware items from a catalog. I don't buy if I can make it myself, is my motto, and thus such things can be rescued. Problem is only that there is only that many that you can actually reuse yourself, even if you make cloches for the plants in your garden. OK, I guess it depends on the size of your garden.

Waterers: PET and other plastic bottles can also be made into garden waterers, stuck into (spout down), or embedded in, the soil (bottom cut off for the former) and filled (and refilled) with water (as needed). Obviously the bottle needs some holes in it so the water can trickle out.

Whether in the home, the workshop, the garden, or even the home/office, there are reuse and upcycling possibilities for plastic bottles and other plastic containers galore and the possible uses would be enough to fill a book at least.

So, let's reduce the plastic waste that there is by making use of those items that come our way rather than even sending them for recycling. A bit like with glass jars that can be used for storage and such it means what you can reuse and upcycle you do not have to buy. A win-win situation for you and the Planet.

© 2018

Zip ties and their many uses

by Michael Smith (Veshengro)

Zip ties and their many uses on the farm, homestead, the garden and elsewherezip-tiesZip ties, or as they are called in England, cable ties, are, even though they are plastic and some people do have a problem with plastic, are often a godsend when it comes to temporarily or even, more or less, permanently fixing something, be this in the home, on the farm, the homestead, the garden or elsewhere. The uses literally are legion.

While, as said, those little (and not so little) ties are plastic and thus (probably) not all that green but they are so very useful for so many things, be it for temporary or even permanent fixing of things.

These simple strips, typically made of plastic, come in many lengths and feature a special ratcheting design, some even can be reused in that they have a “reversible” catch. When you insert the pointed end into a slot at the opposite end, it latches firmly in place and creates a loop that can be tightened (but not loosened – unless the special kind) to whatever size you need. You can combine multiple zip ties to create much longer zip ties.

The potential uses for zip ties are almost limitless and all I can give you here are a few example of their uses around the farm, the garden, the homestead and the home. As far as I am concerned zip ties are so useful that I even pick up any unused ones that people, who have been using them somewhere, have dropped. Weird, I know, but then that's what I am like; waste not want not.

The uses for those – predominately – plastic strips, those cable- or zip ties are legion and, more or less, I should guess, endless, on the farm, in the garden, in the home, and elsewhere.

Installing wire mesh fencing: When installing mesh wire fencing, it doesn't get much easier than securing the wire in place with large zip ties. The evenly spaced gaps in the mesh wire ensures that you can slide the ties through wherever necessary, securing them around metal stakes to hold the wire upright. They work equally well for installing deer netting.

Guiding grape vines and other climbers: Simply attach the vines to the trellis of wires or fence on which you want them to grow up on with zip ties. It could not be easier. Eventually, the vines will curl their tendrils around the wires and be able to support themselves, but in the meantime, the ties effectively hold the vines in place.

The same applies to all kinds of vines, not just grape vines, and delicate plants that need support can also be helped with zip ties.

Repairing fruit tree branches: Unfortunately, it's fairly common for fruit trees to overestimate how much fruit their branches can support and branches can crack under the weight of a heavy crop. However, as long as the branch is not fully broken, it is possible to support it with a stake and allow the tree to heal the crack. Zip ties are an important part of the process, perfect for holding everything in position. This may even work, though I have not tried it, with tree saplings that have been accidentally broken though not completely off.

Securing tarps: Need to tie down a tarp to keep something dry? Loop some zip ties through the grommets on the tarp and secure it in place. It does not get easier than that now, does it.

Pole bean teepee (pole beans = runner beans in Britain): When installing bean poles and turning them into the teepee shape there is no easier way than using some cable ties and, voila, ready is the thing. While it is possible to do it with string, or wire, doing it on one's own with the latter two can be a little bit of a problem, time-consuming and fiddly. Not so with cable ties.

Bicycles: Here they have their first uses, obviously, to hold cables and such in place, but there are also things on the bike that can be temporarily or permanently tied down with cable ties.

Shower curtains: Want to put up a shower curtain (think tarp but hanging down) onto a pole and there are no hooks or rings. Zip ties through the grommets and over the pole and voila, there it hangs ready for use.

This is but a very small list of the uses for zip ties around farm, homestead, home, etc., and one could, I should guess, fill a small book with them at least and after publication of such book another hundred uses would come up. So, maybe, a book I won't write about it.

© 2018

Plastic frozen food bags as hanging basket liner

by Michael Smith (Veshengro)

Wall_hanging_basket_lined_with_frozen_food_bag1I am one of those people who take reuse and all what is related to that to another dimension at times, as regular readers will know, and I do, yes, tend to keep those bags from frozen food.

Being a vegetarian, single, and not being able to shop for fresh vegetables daily or such, I tend to buy them frozen. Alas, they then come in those bags. But waste not want not they are, after being rinsed out, used for all manner of things, such as sandwich bags and, well, in this case to line hanging baskets.

While coir liners are compostable and all that they cost money and they don't always come in the shape of the particular hanging basket – or container that one is repurposing as a hanging basket – and I also often like to keep the plants in those baskets for longer than the lifespan of a coir liner.

Previously I have used cut up potting compost bags and such but none to hand when I wanted to do a hanging basket – this one, as you can see from the picture, however, is actually a wall mounted one – and remembered that I did have those frozen food bags.

Well, cut a long story short – and cutting was involved in the work as well – two bags later with the help of my trusty garden scissors the basket was lined and then filled with leaf mold. The latter no longer involved any plastic bags or cutting. The cost of the entire exercise? Aside from a little battery power for the drill to make the whole for the screw to hold the basket – zero. The basket was found, the screw and rawlplug, aka wall plug or screw anchor, too. Waste not want not obviously.

© 2017

Reusing plastic utensils in the garden

Reusing plastic utensils (flatware) in the garden (and elsewhere)

by Michael Smith (Veshengro)

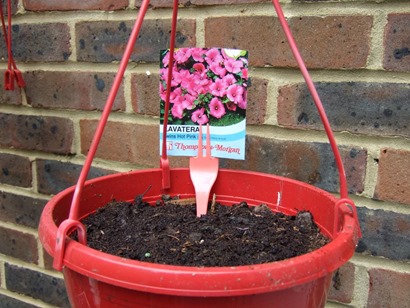
Plastic fork plant label holder1-webDon't toss those plastic knives, forks and spoons. There are number of reasons why you should plant them in your garden beds instead. No, they do not sprout roots if you do and reproduce, but for other reasons.

These days people are looking to be more environmentally conscious, which means using reusable utensils instead of plastic ones. However, if you have to use plastic utensils there are ways that you can reuse them instead of just tossing them out after eating one meal.

Also, although to some this may sound gross, why not pick up and take home those plastic cutlery pieces you may find laying about when on a walk or such. Plastic utensils can work wonders for your garden. Well, if not directly wonders then they still can be useful.

Deterring garden “pests”

Place plastic utensils in your garden to keep pests that might sabotage growth, like dogs and cats, at bay. They will not want to maneuver around the pointed objects where your fruits, vegetables, and flowers are in the process of growing.

If you have animals who like to trounce or do their business in your garden, certainly may want to use this option. You can remove the cutlery when your plants grow.

You, obviously, won't keep slugs and snails at bay with this method but it could help to keep squirrels, cats, and others off your plants when they are growing.

Plant labels

Don't waste your money on fancy garden labels. You can write the names of your plants on handles of the utensils and stake them in the ground next to your plant.

This goes especially for the white of light colored ones, not so much the black ones, unless you have a white permanent marker.

Alternatively, use plastic forks, and here the color does not matter, stuck into the soil by their handles, and tuck the pack into the tines.

White plastic spoons, for instance, you could paint and then write the name of the plant, or draw/paint a picture of it, on the spoon. The back of the bowl probably would work best for this.

Make a little fence

Place forks into the soil with the prongs facing upward and in a row to create a spiked fence. This will keep squirrels out – well, hopefully – and can also make a cute fence for a fairy garden, if you are thus inclined.

Strong plastic forks – more of the reusable plastic cutlery kind that people nevertheless tend to treat like disposable – can also serve as small garden forks in pots, hanging baskets, and window boxes, etc. for loosening soil should this be deemed necessary.

Oh yes, I did not get around to ideas about the “elsewhere”, but that might happen in another article.

© 2017

HOME SEED DRYING & STORAGE

plant picture

This is a really important bit. You need to dry your seed out, or it will not keep.

Seed that is air-dry is not really properly dormant - its just napping;
so it is still burning through its stored reserves of energy and will soon run flat - like a mobile phone left on.

Also, you can't put it in a sealed container as it is still breathing - it would suffocate. And without a sealed container, it will soon reabsorb water from the air on the first humid day, and start getting ready to germinate.

How can we dry the seed at home?
We'll use dry rice to suck the water out of the seed & get it really dry. Then it will hibernate completely.

You need to get:

  • a big jam-jar with a good lid,
  • an old pair of tights,
  • a rubber band,
  • and some rice

You need to use at least twice as much rice as you have seed. It doesn't matter if you have too much rice, but too little won't work.

Read more here.

Across Africa, a New Kind of Container Garden Is Changing Women’s Lives

Growing food in sacks uses fewer resources and less labor and provides high yields too.

Residents of the Kibera slum in Kenya tend to vegetables planted in sack gardens. (Photo: Tony Karumba/Getty Images)

Some people have the talent to take a simple idea and adapt it into a solution with far-reaching benefits. Take Veronica Kanyango of Zimbabwe, a grassroots organizer who works in home-based health care and hospice for people with HIV/AIDS. She’s managed to take a couple of bags full or dirt and turn them into an agrarian movement.

“You show her a sack garden, and she’s turned it into a network of women who are producing lettuce and tomatoes for the Marriott hotel,” said Regina Pritchett of the Huairou Commission, a nonprofit that works on housing and community issues for women across Africa.

Using bags of the sort you stuffed yourself in for a race on field day—which are filled with manure, soil, and gravel—sack gardening or farming has been successfully adopted in areas of Africa where agriculture faces distinctly different challenges. It’s proved an effective way to grow food in regions with drought as well as areas prone to flooding, in rural communities and in urban slums. At the Grassroots Academy coordinated by the Huairou Commission in the spring of 2014, Pritchett said, the concept exploded.

“Of all the practices in the room, that’s the one people were most excited about. There’s not a high cost to get started, you’re not waiting on someone to give you seed funding. You could grab a sack and do that tomorrow,” she said.

Read more here.

An Easy Way to Multiply Your Shrubs

Have a shrub you love and want to make more? Create genetic duplicates with this easy technique

layering shrubsLayering is a plant-propagation technique that allows gardeners to make clones, or genetic duplicates, of their flowering shrubs and climbers. “Layers” are easier to root than stem cuttings because they remain attached to their parent plants—getting all the nourishment they need—while their new root systems develop.

Autumn is the primary season to layer deciduous shrubs in USDA Plant Hardiness Zones 7 and warmer; where winters are colder (and for evergreen shrubs), spring is the better choice. Some shrubs will send out roots in a matter of weeks, while others may take anywhere from 2 months to a year. During this time, the gardener need do little more than keep the soil moist and watch for developing roots.

Read more: http://www.organicgardening.com/learn-and-grow/an-easy-way-to-multiply-your-shrubs

Make your own propagator

by Michael Smith (Veshengro)

recycled propagator 3While, no doubt, you could and can go and buy you plant propagator, such as the fairly inexpensive Propagro, you can easily make your own plant propagators at no cost, almost.

The easiest way it to make such a propagator for individual pots is to use a clear plastic bag, place the pot (with seed(s) inside) and lightly close the top of the bag. It works! I have done it and that more than once. And this is a great reuse for those clear plastic produce bag one has to use at so many of the greengrocers in which to package the fruit or vegetables.

Another way to make your own propagator, and you are actually recycling or reusing and upcycling, whichever term we should use here is irrelevant, is to put PET bottles – bottoms cut off/out – as cloches over the pots (or even seeds/seedlings/plants outside). The caps make it possible then to control, of a fashion, the air flow and you can take the caps of entirely to give more air. Alternatively you can poke a little hole into the caps for airflow.

Reusing PET bottles in the garden is not only reserved for use as cloches and propagators but propagators is what we are concerning ourselves with at the moment.

Small bottles, such as half-liter or liter ones work well to put on standard plant pots to grow on individual seedlings while the larger two liter or even larger ones, such as the large water bottles, work well over larger plants to keep them warm-ish, even in the colder months.

Obviously, it will not keep tender plants that really should be in a greenhouse during winter from freezing but other plants can, possibly, kept going for a much longer time with such cloches.

The best use for such recycled cloches, in general, however, is to use them for starting off seeds.

© 2014

How to Propagate Plants

Here's a beginner's guide to plant propagation

Learning to propagate plants—to make new plants from existing ones in your home and garden—is one of the most exciting and rewarding aspects of gardening. Many of the methods are easy, and you don’t need fancy or expensive tools. Propagation is cheaper than buying large numbers of plants, so with a little time and effort you can fill your garden quickly at minimal cost. Propagating new plants will keep your house and garden full of vigorous specimens, and you’ll probably have plenty to give away, too!

You can reproduce most plants by several methods. There are two major types of propagation: sexual and asexual. Sexual propagation involves seeds, which are produced by the fusion of male and female reproductive cells. Asexual propagation methods use the vegetative parts of a plant: roots, stems, buds, and leaves. Division, cuttings, layering, budding, and grafting are all asexual methods. Spores (produced by ferns and mosses) may look like seeds, but they are technically asexual structures, because they have a specialized way of forming new plants.

Select a technique by considering the plant you are working with, the materials you have, the season, and the amount of time you are willing to wait for a new plant.

Seeds
Growing from seed is an inexpensive way to produce large numbers of plants. Annuals, biennials, and vegetables are almost always reproduced by seed. You can also grow perennials, shrubs, and trees from seed, although the seedlings they produce may not resemble the parent plants. Raising seeds requires few materials: a container, a growing medium, and seeds. The time to sow seedsdepends on the type of plant. For most garden plants, you can sow seeds indoors in late winter or outdoors in spring. Tree, shrub, and many perennial seeds may need a cold period or other treatment before they will germinate. Depending on the type of plant, it could take anywhere from weeks to years to get a garden-sized specimen. For complete information on growing plants from seeds, see the Seed Starting and Seed Saving entry.

Spores
Spores are the reproductive structures of ferns and mosses. To produce new plants, sow these dustlike “seeds” on a sterile medium and cover them to maintain humidity and prevent contamination. Clear plastic shoe boxes or cups are ideal containers for propagation. You can collect spores from your own ferns or buy them from specialty catalogs. You can sow spores whenever they are available. The new plants will be ready for the garden after a period of months or years.

Read more: http://www.organicgardening.com/learn-and-grow/propagation

6 Household Items You Can Upcycle for the Garden

Got a pile of junk destined for the curb? Give it new life as a trellis or planter in the garden.

6 Household Items You Can Upcycle for the Garden - Photo courtesy Nico Cavallotto/Flickr (UrbanFarmOnline.com)Gardeners are a resourceful bunch, and there’s nothing better than creating conversation pieces for the landscape. The garden is the perfect place to repurpose materials from the home that have outlived their traditional function. It’s much more satisfying to use an old household item rather than to buy something new, particularly if it would otherwise be destined for the curb. Here are some ideas for upcycled garden features to help get your creative juices flowing.

1. Baby Crib Trellis

Discarding a well-loved baby crib can be emotional, but using it in the garden to support vining plants gives it new life. A simple and sturdy structure can easily be put together by setting the sides on end in an A-frame configuration. You can also use the end pieces, which are more narrow but typically taller, for a support system for taller plants. Fasten them on the top with twine or zip ties.

Even the springs from older cribs can be utilized when fastened to remain upright. Most cribs are roughly 30 inches wide, giving you a medium height for trellising vegetables like peas or cucumbers. Secure it by pounding two 36-inch pieces of rebar 10 inches deep at each end of the springs, then set the springs upright against them, and attach them to the rebar with wire or twine. If you’re using wire, be sure to bend it down flush so you don’t poke yourself when the vines grow over and cover the sharp ends.

2. Vertical Shower Support

If you’re looking for a functional piece of botanical art, keep your eyes open for a free-standing shower with the ring to hold a curtain attached at the top, such as one used in a claw-foot bathtub. Secure the vertical pipe to a firm post to keep it from moving or tipping over. To create a living shower curtain, grow hops or other vining plants up strings going from the ground to the top ring. And, for the shower, add a hose attachment to the bottom of the pipe in order to easily screw on the garden hose for a quick wash after working in the garden.

3. Windows for Cold Frames

It’s hard to resist interesting, old windows. With enduring character, they’re often an inexpensive choice for a unique lid on a cold frame. However, be cautious when recycling windows. Those with single panes of glass break easily and should be absolutely avoided if there are children or pets in the garden.

Tempered glass is a better option, though it can be heavy and unwieldy. It also can’t be cut to fit a frame, so you’ll need to construct your cold frame size around the dimensions of the glass. Use caution with these heavy windows, as they can be difficult to maneuver and would hurt tremendously if the lid accidently slipped and fell on an arm or head.

Be aware of lead paint on old windows, as well. If they were pulled from a home prior to 1978, there’s a distinct possibility lead paint was used on them. This is even more prevalent in homes before 1940. Unless you plan to refinish these windows you should probably steer clear.

Read more: http://www.urbanfarmonline.com/urban-gardening/backyard-gardening/6-household-items-you-can-upcycle-for-garden.aspx

A Quick and Easy Fruit Picker

FruitPicker10When fall comes and my arms are not long enough to reach all the peaches, apples and pears on our trees, I turn to some homemade gadget or other to harvest that fruit.

A ladder? No! Ladders are great on flat, level surfaces, but nowhere on our mountain-side property is there a flat surface: Everything is a slope of some kind, and most of our fruit trees are on a steep slope.

In the past I’ve used a mini-rake with a couple of pegs in a cross-bar on the end of a stick to pull fruit down. Unless someone else was there with a catcher’s mitt, the fruit hit the ground, which bruises it. Often it rolled down the hill necessitating pursuit. I’ve fashioned a “claw” by mutilating a wire coat hanger into two fingers above and a “thumb” below. If the thumb is more of a ring, the piece of fruit could sometimes be lowered down from the tree for retrieval. Sometimes. Other times it would fall off, hit the ground and skitter away.

This year I saw an idea on the Internet – the photograph I saw was a Facebook repost from Pinterest. It’s hard saying where it originated. It uses a plastic beverage bottle on a stick as a picker-catcher. I decided to try that this year.

The Bottle

You will want a plastic beverage bottle – the kind with “feet” on the bottom. These add rigidity to the picker part and help for a claw that captured the top of the fruit. The picture I saw used a 2-liter soda bottle. I don’t have a 2-liter bottle today so I used a 1-liter vinegar bottle that I do have.

Use a marker to lay-out your cut-out. You want to cut away one “toe” and a portion of the bottle side large enough to slip the device over the fruit you’re harvesting. The size of the fruit you’re going after will determine the size of bottle and the opening you need. I’m going after fist-sized apples, peaches and pears; if you’re harvesting grapefruit, you’ll need a bigger bottle!

It’s important to make the cut at the bottom of the bottle between the toes so you leave as much rigidity there as possible: Some of your adversaries will not come along willingly.

Read more: http://www.grit.com/farm-and-garden/fruit/a-quick-easy-fruit-picker.aspx#ixzz3BF0t2cqj

Beginner's Guide to Home Seed Production

Beginner's guide to seed production, including pollination, collection of seeds, and planting seeds of beans, beets, cabbage, carrots, corn, cucumbers, cantaloupes, watermelons, lettuce, onions, peas, pumpkins, squash, radishes, spinach, tomatoes, and turnips.

Seed production is a science in its own right, and a complete study of the subject would take many volumes. This article is meant to be only a very basic guide for the beginner who wants organically grown seeds-free of any chemical-and who enjoys new challenges in gardening.

Home Seed Production

Saving the seeds of garden vegetables really isn't too difficult if you observe a few basic rules:

[1] Plan your garden with seed collecting in mind which means, for one thing, that the original plants must be standard varieties, and not crosses. This is because seeds produced by hybrids give very unreliable results: The offspring may revert back to either parent or even turn out to be something quite unexpected!

[2] Many closely related plants can cross if they're grown near one another (how near depends on the method of pollination for the particular species). Thus, if seeds are to be saved from the yield of a small plot, only one variety each of most vegetables should be raised. A larger area allows more freedom to diversify provided you understand the mechanics of fertilization in whatever crops you're growing, and arrange your plantings accordingly.

Some plants, for example, are wind-pollinated, and cross readily as their fertilizing dust drifts on the breeze from flower to flower. Variants of such a species must therefore be widely separated (or screened from one another by several rows of corn or a similar tall crop).

Other garden favorites are pollinated by insects and had better be grown in single varieties on the average homestead, since you can't control the movements of the small flying "helpers". (Commercial seed producers separate different varieties of such Vegetables by at least a quarter mile and often much more. — MOTHER.)

The greatest scope for diversity in your seed-saving program is among self-pollinating plants (those that have both pollen producing anthers and pollen-receiving stigma enclosed in the same flower). Accidental crossing is rare with these species and close relations can be grown in a modest-sized plot with little risk of mixing the strains.

[3] Remember to collect seed only from individual plants that show the best characteristics of their kind. Don't just settle for the first ripe specimen in a particular row! Careful selection of the finest, most vigorous stock may result-over a period of time-in a special sub-variety that's particularly well suited to your area or soil.

Before going any further with this article, of course, it's only fair to warn you that most authorities on horticulture don't recommend the saving of seeds from the home vegetable patch and it's true that your harvest's offspring won't be as uniform and predictable as those obtained from a commercial grower (who operates under controlled conditions). Nevertheless, this is a fascinating project, a real money saver at current prices, and a good alternative for the organic gardener who wants to be sure his future plants are free of chemicals.

Read more: http://www.motherearthnews.com/organic-gardening/home-seed-production-zmaz75jazgoe.aspx#ixzz3ArtBAUWt

19 Garden Hacks for Thrifty Gardeners

Gardening doesn’t have to be difficult or expensive with these solutions using items already found around the farmhouse.

19 Garden Hacks for Thrifty Gardeners - Photo courtesy Nikol Lohr/Flickr (HobbyFarms.com)Call them shortcuts, money savers or clever tricks, but many thrifty garden-management practices, or "hacks,” have proved worthwhile for penny-pinching hobby farmers.

As many natural and organic growers already know, a gardener can experience success without leaning on big-box stores, harsh chemical sprays, pre-mixed fertilizers and pricey garden tools. For many of our parents and grandparents, remedies for garden challenges, such as pest repellants or fertilizers, originated from household staples and repurposed everyday items. While these garden hacks can save you money and a trip to the store, they can also provide a more natural approach to gardening that many growers—and eaters—desire.

Seed Starting
Sometimes the beginning of gardening season can seem the most overwhelming—and pricey! Take the pressure off the start of garden season with these easy hacks.

1. Upcycled Seed-Starting Pots
Egg cartons with holes punched in the bottom and clam-shaped plastic containers from the grocery serve as great seed-starting containers. As plants grow to larger sizes but aren’t quite mature enough for the garden, transplant into recycled containers, such as yogurt tubs with holes poked in the bottom.

2. Germination Station
Pricey seed-starting mats aren’t necessary to warm starting plants. Encourage germination by placing plants on top of a source of heat in the house, such as the top of a refrigerator or on a table above a heat vent, bearing fire safety in mind, of course.

3. Pinching
It might feel wrong for a second, but splitting the center of the stem, known as "pinching” the plant, will encourage a new set of leaves to grow and restart the plant on the right path. This little trick saved me from losing several tomato plants that suffered a UV light tumble.

4. Save Leggy Starts
Don’t fret over leggy plant starts that wobble and fall over. When they’re ready to move outside, simply angle the plants, keeping the roots shallow. With ample natural sunlight, the plant will eventually grow upward.

Pest Control
Nothing’s more frustrating than discovering pests have destroyed your garden. No amount of netting or toxic product will guarantee the bugs won’t help themselves to a feast on your vegetables, but these homemade solutions are sure to help.

5. Coffee Ground Mulch
Coffee grounds (in moderate doses) are a healthy source of nutrients for your soil and are also great at deterring aphids. Simply mulch around your plants with your morning’s coffee leftovers.

6. Spicy Aphid Spray
Mix cayenne pepper, jalapeño seeds, mashed garlic and water, place in a mason jar, and set out in the sun for a couple days to create a natural aphid deterrent. Recycle a store-bought spray bottle and disperse this concoction over the leaves of susceptible plants.

For added aphid-proofing, plant scraps of garlic in and around your garden or use onions or a single clove of garlic as a companion plant to vegetables that attract pests. Other gardeners’ tricks include spreading tobacco, a natural pest deterrent, into the soil and spraying diluted laundry detergent on the leaves of plants. You can also suffocate aphids by hitting them with some cooking oil.

7. Marigold Borer Repellent
Borers, aka caterpillars, have a special interest in cornfields of the South and cause substantial problems for gardeners. Deter the pests with a homemade concoction of crushed marigolds soaked in 2 quarts water. Pour the liquid over your soil where the caterpillars attack. Simply planting marigolds around the garden can also help deter borers and other pests.

8. Ant Defense
If an ant infestation has plagued your garden, boil citrus peels in water and pour in susceptible areas to deter the colonies. Leftover water from a pot of boiled sweet potatoes also works.

9. Wire Pest Poker
No hack replaces the simple act of spending time in your garden and watching for pests. Use an old, wire clothing hanger to poke caterpillars and dispatch of the pests as you see them.

Homemade Tools
Why buy pricey garden tools when you’re already equipped around the house with a variety of tools for gardening?

10. Seed Sower
Push old wine corks into a garden rake at the depth you intend to sow your seeds to create a makeshift seed sower.

Read more: http://www.hobbyfarms.com/crops-and-gardening/19-garden-hacks-for-thrifty-gardeners.aspx