Showing posts with label growing things. Show all posts

Vertical Pallet Garden Plan

Use these step-by-step instructions and build your own vertical pallet garden, perfect for growing your own food in small spaces.

Groundbreaking Food Gardens (Storey Publishing, 2014) by Niki Jabbour is a stellar collection of unique food garden plans from some of the best gardeners and designers in North America. Choose from 73 plans, each with its own theme and detailed illustration. In this excerpt, learn how to construct a kitchen garden from used pallets that won’t take up much space.

You can purchase this book from the Mother Earth Living store: Groundbreaking Food Gardens.

Pallet Garden PlanPallet gardening is popular, and for good reason! With a little time and even less money, gardeners can turn an old pallet into a handy vertical garden. An upcycled pallet, mounted on a wall or fence — preferably just outside the kitchen—makes a handy planter for compact crops like curly parsley, leaf lettuce, and Swiss chard, and even dwarf tomatoes and nasturtiums.

Joe Lamp’l is passionate about getting people to grow more food—even in tiny urban lots and concrete balconies—and he has embraced the concept of a pallet garden for its incredible versatility. Pioneered by Fern Richardson in her blog Life on the Balcony, pallet gardens are typically mounted to a wall, fence, or other structure, but handy gardeners can also make “feet” or a stand so that pallets can be freestanding on decks and patios. Plus, an edible pallet garden is very low-maintenance, requiring little ongoing care aside from regular watering and an occasional dose of liquid organic fertilizer.

A pallet garden is a great project for do-it-yourself types, as well as those on a tight budget. Two people can assemble and plant a pallet garden in about an hour if all materials are gathered beforehand.

Picking the right pallet. Sourcing a pallet should be easy—many businesses are happy to share their used pallets at little to no cost—but Joe says to “look for pallets made of untreated wood and also seek out pallets marked HT, which stands for heat treated, as a safe alternative for treating pests.” He also suggests inspecting the pallet for splintered wood or stray nails. Once you’ve found one that makes the grade, give it a good hosing off to remove dirt and grime.

The best plants for a pallet. When choosing plants for an edible pallet garden, Joe advises looking for dwarf or bush types of vegetables and herbs, as well as compact fruits like strawberries. In his plan he includes a wide selection of favorite edibles: salad greens, zucchini, cucumbers, peppers, and tomatoes. “Peppers and tomatoes will need to go in the top section because they are the tallest and will need room to grow and possibly staking,” says Joe. “The big thing is to work with compact and determinate tomato varieties wherever possible.” He also suggests tucking nasturtium seedlings throughout the pallet garden for a “punch of edible color.” Other options include a pallet filled with culinary herbs or salad greens.

Read more: http://www.motherearthliving.com/gardening/vegetable-gardening/vertical-pallet-garden-plan-ze0z1407zpit.aspx#ixzz3A6qADjKd

Growing carrots in containers – yes, it can be done!

by Michael Smith (Veshengro)

Most people believe that carrots, potatoes and other root crops (as well as cabbages) cannot be grown in containers and need large beds of one kind or another. That, however, it not true.
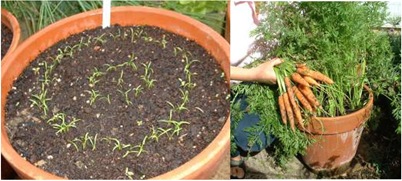
carrots_in_containersIt is easy to grow carrots (and other vegetables) in containers, be those large “flower” pots or other tubs. In fact, as far as container types are concerned the sky – or better your imagination – is the limit. Do NOT, however, plant any vegetables whatsoever in tires unless they did have inner tubes. The steel radial belted tires are not suitable as they leach cadmium into the soil which is taken up by the plants and is harmful to health. In fact, my advice is to leave tires well alone and use only, if you want to, for the growing of flowers, cut or other, but not for food. That means also no nasturtiums in tires as you may want to use the leaves and flowers as they are edible.

In order to grow carrots – and other veg – in containers all you have to do is get the container you want, and this can even be an old bathtub, fill with compost and this can be compost you have bought in or made yourself (or use the lasagna gardening method (and no, you won't be harvesting lasagna, however nice this would be), and then sow the carrots, or other veg. Or you can use plugs you have grown yourself from seed or bought. Do not, however, do this with carrots or their relations as they do not like to be moved.

If you use a round tub you can sow, I tend to do, in a circular fashion and don't fall for the instructions that you have to thin them out. You don't have to.

As I have said, the containers that you use are basically irrelevant. Just ensure there is enough depths of soil.

I have very successfully grown carrots in shopping carts converted to planters and, in fact, this year has me using a cart for this again where last year there had been pole beans growing in them.

Container vegetable growing with carrots has a lot going for it as the environment is so easy to manage, and this goes for about every kind of vegetable imaginable. It is the easiest way I know for how to grow carrots and any other vegetables. I also grow successfully potatoes in containers of various kinds and sizes and,, another word of wisdom from myself: You do not have to use seed potatoes either. Just use any that have sprouted, even supermarket bought ones.

Carrots in containers are target for the dreaded carrot (root) fly in the same way as those that are grown in beds. However, when the planters are about waist height off the ground the problem seems to be reduced to averted, as I found with the ones grown previously in a shopping cart.

If any roots of the carrots begin to show above soil level earth them up to cover the them in order to lessen the chances of a carrot fly attack. The fly is apparently attracted by the carrot smell and also you do not want the tops to green off.

Talking about greens. The greens of the carrots are also edible and make good soup so do not discard the leaves but use them instead. Waste not want not was the old adage of my grandparents and has seen them well through the lean years.

Sowing your carrot seed

Sown over the months from mid-February to July you can be eating carrots from early June to October. Storing this vegetable correctly can increase that period even longer. Below is a list of the average sowing and harvesting dates that will act as a rough guide on how to grow carrots at the correct times in the British Isles. They will vary in other areas, such as the USA, mainland Europe, and especially Down Under.

  • Sow mid February and protect with a cloche. Grow an early variety which you can harvest in early June.

  • Sow March and protect with a cloche. Grow an early variety which you can harvest in June/July.

  • Sow April - no protection necessary. If you grow an early variety expect to harvest July/August. A main crop variety will be ready August.

  • Sow May. Grow a main crop variety and harvest in August.

  • Sow June. Grow a main crop variety and harvest in September.

  • Sow July. Grow a main crop variety and harvest in October.

Remember that for container the spacing does not apply and, as said already, do not worry, necessarily, about thinning them. All too often you end up pulling those that you do not want to pull out with those you aim for.

Caring for your carrot plants

As you are growing them in a container using a hoe, with the exception of a small wire hoe, such as the Agralan Threadhoe, is not possible and thus you will have to remove any weeds by hand.

Water enough to keep the ground damp as splitting of the root can occur if the watering is too irregular. Also water with a liquid feed on a regular basis. They respond well to this.

Carrot pest control

The carrot fly is the carrots' worst enemy. It is a small black fly which lays its eggs in the soil at the base of the plant and it is the small maggot that hatches from those egg that causes the damage. The tell-tale signs of carrot fly infestation are reddish leaves which droop in sunny weather.

As the maggot eats out the carrot root the foliage turns yellow and the root is liable to rot. Needless to say seedlings are shown no mercy and are soon killed. The fly tends to be most common in May.

There is no known treatment against the carrot fly, even if one of the other chemical claims so and thus preventive measures are the only safeguard that you can undertake. It is essential to learning how to grow carrots and indeed any vegetable that you get to know your enemy.

  • Cover seedlings with a plant fleece in spring.

  • Destroy thinnigs immediately - bury, burn or trash can.

  • If carrot fly infestation is bad in your area then harvest early varieties no later than August and do not sow main crop varieties until June.

  • Infestation seems worst on dry soils so keep the ground damp at all times. This also prevents root splitting.

One thing to remember in learning how to grow carrots is that the carrot root fly's 'flight path' is low and in a straight line. It is for that reason that I said about placing the containers above ground at about waist height. Also makes it easier for your back in dealing with the plants.

If you grow at ground level then try erecting a low 'fence' around your carrot growing rows – about 30 cm (12") high. It could be made from fleece, fine netting or similar.

Harvesting your carrots

You can start harvesting the earlier varieties sown from about June onwards. Careful, even if grown in tubs, loosen the soil around the plants – you won't be able to use a garden fork, not even a border one, but a hand one will work – if necessary.

If you intend to store some of your crop of carrots for over winter then October is the best month for doing this. Lift the main crop varieties, clean off any soil – use only undamaged carrot roots – and cut the foliage back to about 12 mm (1/2") above the crown of the root.

Using a stout box place the roots on layers of sand – ensuring that the carrots do not touch each other and then store this box with the carrots in the sand in a dry place and inspect regularly to remove any that may have started to rot. This way they should keep until March.

Canning your carrots in a variety of ways is another great option and thus learning the skills of canning is also a good idea.

© 2013

Don't throw out your leaves!

Do-it-yourself leaf mold is great to improve your garden's soil

by Michael Smith (Veshengro)

Instead of raking the leaves in your yard and garden together, putting them into plastic bags and setting them on the curb to be picked up and added to a landfill, where most will end up via the municipal waste stream unless your council operates a green waste recycling scheme, turn them into leaf mold.

The dark, crumbly finished product of leaf mold is a great soil amendment and conditioner and if we are going to be dealing with droughts in our gardens in the future, which no doubt we will, increasing the moisture retention of our soils is important. Leaf mold is better still than wood chip mulch in this department as it improves the soil much better and quicker.

Finished leaf mold can be used as a mulch to suppress weeds and trap moisture, blended into the soil of garden beds, and added to container gardens and making leaf mold is, in fact, ridiculously easy. If composting seems too complicated and involved for you: give making your own leaf mold a try. All you need to create leaf mold is a space, leaves, water and time.

The easiest way of making leaf mold is to rake all of your leaves into a pile in the corner of your garden or yard. Once you’ve gathered the leaves into place, wet the pile down and keep it moist for the next six months to a year. If your leaf mold pile is at risk of being thrown about by kids, pets or the wind create pen to keep it in place.

Make a round or square frame out of chicken wire, reclaimed wood or similar to the DIY compost bins the designs of which you find all over the Internet. You can also put the leaves, ideally shredded, into black plastic bin liners, moisten them and then tie up the bags.

If you have a mulching mower you can speed up decomposition by riding over your leaf mold pile and shredding the leaves into smaller pieces.

A few years ago while watching one of those cable documentaries on the drug trade, I saw a cocaine farmer use a weed trimmer to shred cocoa leaves to process them faster. And you know what? It works! After you’ve corralled all of your leaves in place you can run a weed trimmer through the pile to break it down. Shredded leaves not only break down faster, but you have room for more leafs and taller piles.

All leaves you collect in autumn are good candidates for making leaf mold, though some are better than others when it comes to breaking down and decomposing. Smaller leaves, such as birch, alder and Japanese maples, can break down in as little as six months. Oak and hornbeam leaves similarly break down rather fast.

The bottom of your leaf mold pile can be ready to be mixed into your soil, used as a mulch, or mixed into your favorite container gardening soil mix in as little as half a year. Therefore, take some time this season to rake up your leaves – and those of your neighbors – to improve the soil in your garden. You will be keeping valuable organic matter out of landfills and preventing your neighbors from making burn piles this autumn.

The leaves have sequestered carbon over the year and this carbon is released into your soil when added to it and will feed your plants. So thus you should not waste it.

If you grow your own – vegetables that is – in the way that I do in “containers” of various sorts you can use the so-called lasagne gardening method and, in fact, add the leaf mold after six month to the bottom of the container and spread a thin, about four or five inches or so, layer of soil and compost above in which you sow your seeds or plant your plugs.

Waste not want not is the old adage and it applies also to those autumn leaves.

© 2012

Growing your own has many advantages

by Michael Smith (Veshengro)

Growing your own food is becoming once again more and more popular though, while in some areas an allotment cannot be had for love or money in other boroughs they go begging.

No-Till Gardening When you grow your own you can choose to grow for your own tastes rather than the supermarket conformity and in time you will also chose what to grow because it grows OK in your garden rather than trying to grow everything only to fight a losing battle.

I have just come to that conclusion with regards to my food growing in my at home allotment as some things just will not do well here. There are the slugs and snail to contend with and then the location of this garden – with the property being surrounded by trees – lacks the right light condition for some foods.

Potatoes do well, as do Jerusalem Artichoke (aka Sun Chokes). Beans of all types seem to do fire as do carrots, as long as they are grown “at height” to be safe from the root fly. Some abandoned shopping carts do invaluable service there.

Cucumbers, courgettes (zucchini), marrows, etc., also do well. Tomatoes on the other hand do not and brassicas time and again fall prey to the pigeons and the snails and slugs of all types and sizes.

So, I will be, for the next year, chose carefully what I will bother with and what not, as wasting my time I do not wish to do, as I did with the brassicas this year, once again.

While I know that nets would be fine to keep some things at bay, such as the pigeons and the cabbage white butterfly, etc., the snails and slugs seem to be a great menace that even nematodes and slug pellets have problems dealing with.

One the positive note, as said, growing your own is beneficial in many ways and taste, as far as I am concerned is a great reason, aside from the fact that you can save some money.

One skill I advise anyone to learn who thinks of starting or who has started to do his or her own food growing and that is preserving the harvest in which way ever. Pickling, canning, and all the other ways of old – plus freezing – are the skills to have to not waste the harvest.

So, get to it and touch the soil.

© 2012

Growing potatoes in biodegradable cardboard boxes

by Michael Smith (Veshengro)

Growing potatoes in raised beds works well but building a raised bed can be costly and requires hard work. An easy to build, inexpensive, useful and attractive alternative for growing of potatoes can be had by using cardboard boxes.

Because of the hard work of building raised beds and the cost of it I decided to use the existing beds for other crops rather than potatoes and left growing potatoes out for a couple of years.

However, this year I came up with the idea of cardboard boxes, in lieu of the potato patio planters which are rather costly to the tune of about US$35 around these parts of the world. I am thinking, though, of maybe building my own (oar maybe I can find a manufacturer who would like me to review a couple of them). So, I have took two boxes that I had lying about, lined them up in the garden and planted potatoes in the bottom of the box using a soil mixed with mild potting compost. As the potatoes grew, I have added more soil. So far they are growing beautifully but we don't know as yet as to how good they are producing and as to whether it works at all, though there seem to be some small potatoes already to be had.

Such boxes are free, can be quite attractive and will bio-degrade and compost at the end of the season. New ones can be set up the following year and years in different parts of the vegetable garden to help rotate the crops. The top flaps of the boxes can be closed to protect the tender plants from a late frost. It is easy to build up soil around the growing potatoes; harvesting is also easy. You can either reach in for new potatoes, or you can peel the rotting sides away at the end of the season.

It is important to consider that as with all container planting you may need to check a little more on the watering.

So, why not grow your spuds in cardboard planters? No cost (for the planters, I mean) and at the end of the useful life of the “planter” it will compost to soil.

© M Smith (Veshengro), July 2008